In this thread we attempt to post some tips on performing an alignment
Alignment object queue
Argo Navis maintains a queue of alignment objects and by default its alignment is based on the last object you aligned on and the one previous to that.
There is a SETUP menu called SETUP ALIGN PICK which can change the depth of that queue, but we recommend to keep that setting at its default value of
ALIGN PICK=LAST+
PICK 1 OF 1 PREV
The SETUP ALIGN PICK menu is deprecated in favour of more advanced functionality, in particular the Telescope Pointing Analysis System (TPAS) which is controlled from within the SETUP MNT ERRORS menu.
Altitude reference
Telescopes are fitted with incremental encoders and these have no inherent zero reference point when they are powered on.
As it transpires, one only needs to define the altitude reference point. This is the job of the FIX ALT REF menu.
Setting the altitude reference point need not be onerous thanks to an Argo Navis feature called AUTO ADJUST ON when you perform the FIX ALT REF step.
To set it up, DIAL up MODE SETUP, SETUP ALT REF and enter a value of +090.000.
Then when you perform the FIX ALT REF STEP, DIAL up ALT REF=+090.000 AUTO ADJUST ON.
Perform your two star alignment as normal. The WARP factor should then be 0.00 (A) where the (A) indicates the ALT REF point was automatically adjusted.
If you see a non-zero WARP factor when AUTO ADJUST is ON or an (X) instead of an (A), it means something is amiss, such as a misidentified star or cable not plugged in.
Keep in mind that though a WARP factor of 0.00 is a prerequisite for good pointing performance, it does not necessarily guarantee good performance.
The reason is that the AUTO ADJUST mechanism bends over backwards to correct the ALT REF point so as to produce a WARP factor of zero wherever possible, even if you have misidentified the alignment stars.
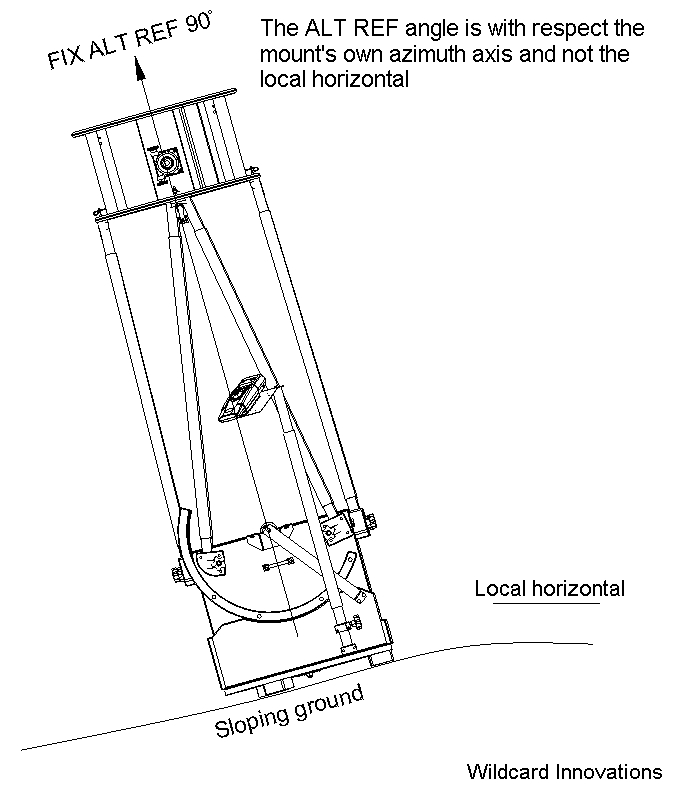
The altitude reference point is with respect the mount's own axis and not the local horizontal as defined by gravity.
One common question user's have is, "Do I need to level the mount", to which the answer is "No".
To illustrate the point, the telescope below is resting on sloping ground. Note that the ALT REF 90° angle occurs when the optical axis of the scope is parallel to the mount's own azimuth axis.

When orienting the OTA using AUTO ADJUST ON, one need only provide the roughest of hints as to the actual angle.
For example, if the OTA were angled at only 80° and the ALT REF point was declared as 90°, AUTO ADJUST ON will still converge to the correct result after the two star alignment.
What this typically means in practice on a Dob is to simply push the OTA to point upward until the mirror box hits the back of the rocker box and will go no further and then perform your FIX ALT REF step.
The whole process should take you only a few seconds.
Only two alignment stars are required to define an alignment
Just as two points define a straight line, two stars are sufficient to define a perfect alignment.
Choice of alignment stars
When using AUTO ADJUST ON, the two alignment stars must have different azimuths in order for its magic to work.
That is to say, when you choose a second star, make sure that it entailed the mount moving in azimuth.
The encoders have a finite resolution. A 10,000 step encoder has a resolution of about 2.1 arc minutes per step. Typically the alignment stars will have angular separations
that are way in excess of the finite resolution of the encoders.
Apart from that, there are no other rules in theory that govern the selection of alignment stars.
In practice, all mounts have fabrication errors of varying amounts that can impact on the pointing performance.
In the face of mount errors, the pointing error residuals will tend to be smallest n the vicinity of the two alignment stars.
With that in mind, it can be beneficial to choose one of the alignment stars to be in the vicinity of the area you are about to observe in.
When moving to a new part of the sky, if it is found that the pointing error has become large, one strategy is to either use MODE ALIGN STAR or
perhaps MODE IDENTIFY in combination with MODE ALIGN to align on a new star in that new area.
When doing that, be mindful of maintaining reasonable angular separation between successive alignment stars. The oldest star will be bumped off the queue and
the one previous to that will take its place. So you will again be aligning on the star you just aligned on and the one previous to that.
For AUTO ADJUST ON to do its magic, those two stars require movement of the mount in azimuth.
Time between alignments
After aligning on the first star, there is no pressing urgency to align on the second.
Though the Earth is rotating, Argo Navis is keeping track of relative time and taking that into account.
In fact it is even taking into account the tiny corrections needed for atmospheric refraction.
So after you align on the first star, you could go inside and drink coffee, chat to a friend on the phone and come back an hour late and complete the alignment on the second star without any penalty in accuracy.
Date, time and location
In general, Argo Navis does not require you to have set the date, time and location in order to perform a star alignment.
However, having the date and time set allows Argo Navis to compute the position of solar system objects and it also is used to compute the small corrections for atmospheric fraction when SETUP REFRACTION is switched to ON
and for precession.
Except when observing artificial satellites, the time and location need not be GPS accurate.
The Moon is close enough to the Earth that its position varies appreciably according to your location on Earth. Set the latitude and longitude in SETUP LOCATION to at least those of your nearest city or town.
When using the ServoCAT, Argo Navis computes where the local horizon is based on your time and location. If an object is computed to be beneath the local horizon, then the ServoCAT will not take the slew.
Therefore you should set the date, time zone and time in SETUP DATE/TIME and location in SETUP LOCATION.
Time zones west of Greenwich such as in the Americas are always negative.
Altitude encoder check for Obsession owners
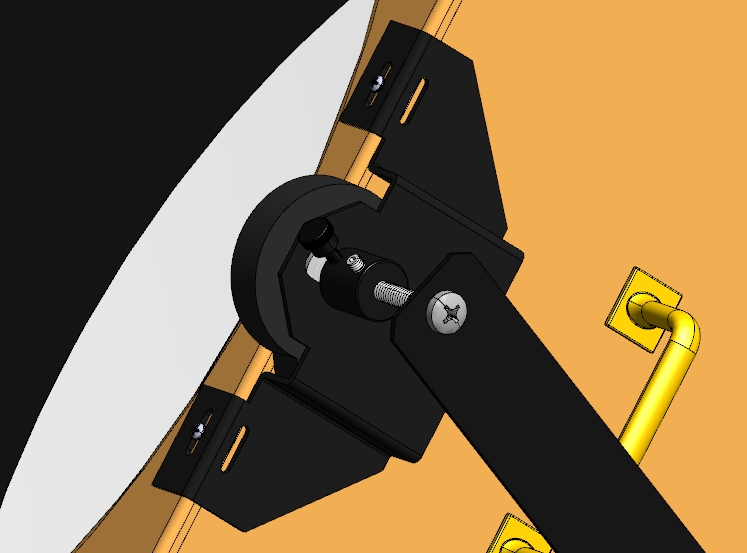
The altitude encoder needs to be mounted at the precise center of rotation.
On the Obsessions the encoder is mounted on a bracket, The bracket is attached to either the edge of the mirror box or the cross bar of the altitude trunnion.
This bracket can be adjusted left or right if required by loosening the thread cutting screws that pass through the slots in the bracket. Re-fasten once positioned.
The encoder is held in pace by a hex nut and can be adjusted up or down. The center of rotation by design lies in the plane of the top edge of the mirror box or the top surface of the bar across the altitude trunnion.
The altitude encoder bracket fastened to the top edge of the mirror box like on the 18" Obsession Classic is depicted in the drawing below

The importance of the exact centering of the altitude encoder cannot be over-emphasized.
If the encoder is not centered, it will precess around the true altitude axis and this will result in a pointing error residual.
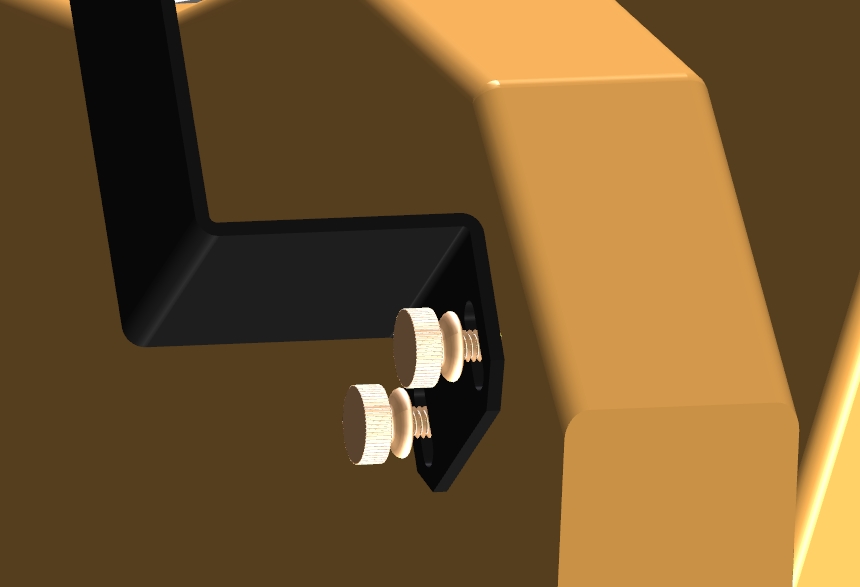
On the Obsessions, the two brass thumbscrews at the far end of the altitude tangent arm should be kept slightly loose as depicted in the drawing below :-

Since the tangent arm is mounted at an angle, gravity will keep it in place so it maintains its reference.
The reason for keeping them loose is because if the encoder is not exactly centered or if the bearing is slightly eccentric, the encoder will precess around the true altitude axis and the
far end of the tangent arm will then want to move radially in or out. If the thumbscrews are tight, then a sideways force will be exerted on the encoder.
The encoders don't "like' sideways force and it can cause them to misread and in the worse case mechanically fail.
Loosening the thumbscrews therefore provides a certain amount of "give".
Myths and misconceptions
Aligning on Polaris is fine. It is just another star in the sky. There is nothing special about it because of its proximity to the celestial pole.
Some users say they will align on a star, then align on a second, then go back and re-align on the first star again in the belief this incantation makes the pointing better.
Whenever you re-align on one of the two alignment stars, the alignment queue is maintained and the information for the star you just aligned on will be updated.
However, doing this is totally unnecessary unless you believe you had not accurately centred the star in the first place.
You probably don't need a reticle eyepiece for alignment. Most of us are pretty good at estimating the center of any plain eyepiece without the need for the cross-hairs of a reticle.
If you have one, by all means feel free to use it. If you don't, a high powered eyepiece is fine.
As discussed above, you don't need to level the mount. Some users mistakenly believe that levelling the mount with a spirit level will improve the alignment. It will not.
Unlike the exaggerated slope in the drawing above, chances are you will setup on reasonably level and flat ground. If the telescope can shift in any way in addition to its altitude and azimuth
motions, it will bring about a random pointing error. If you need a ladder to observe, setting up on level ground makes sense in any case. But it is not a prerequisite for using your Argo Navis.
Mount fabrication errors
For the majority of users, the fabrication errors within the mount are small enough that using AUTO ADJUST ON and a two-star alignment are sufficient.
Ensuring that the altitude encoder is centred and performing what we refer to as the Daytime Encoder Test should be the first port of call for those who are not meeting their pointing performance goal.
See the Argo Navis User Manual pp 123-124 on how to perform the Daytime Encoder Test.
https://www.wildcard-innovations.com.au/documentation.html
Argo Navis has a powerful featured called the Telescope Pointing Analysis System (TPAS).
TPAS provides a means whereby during performing a star pointing test, it can analyse and potentially compensate for some of the more common systematic fabrication errors found within mounts.
For example, see this page for descriptions and animated examples of the pointing error that is induced if the azimuth axis and altitude axis are not precisely at right angles or if the optical axis is not precisely at
right angles with respect the altitude axis :-
https://www.wildcard-innovations.com.au/geometric_mount_errors.html
The Argo Navis User Manual has a comprehensive section describing the use of the Telescope Pointing Analysis System (TPAS). See page 122.
https://www.wildcard-innovations.com.au/documentation.html
A quick tutorial on the use of TPAS appears on this forum here :-
https://www.wildcard-innovations.com.au/forum/posts/list/30.page
![[Logo]](/forum/templates/default/images/logo.jpg)